Creating and Managing Events on Mobilize
Mobilize is the third-party platform that Swing Left uses to help you create and promote events. When you post events on Swing Left’s Mobilize, they’re linked to our website—which allows other Swing Left volunteers to more easily find your event. Mobilize is also used by most Democratic campaigns and progressive organizations that cross-promote Swing Left’s events and will help you reach even more volunteers.
For Swing Left group leaders, your Mobilize events will be connected with your group so that they’re automatically displayed on your group’s page, and volunteers who RSVP will be added as group members.
Any event posted onto Swing Left’s calendar should be in support of Swing Left’s current strategic priorities . Events not related to our strategy will be taken down.
Need a hand? Reach out to host@swingleft.org for support with all things Mobilize. We’re happy to walk you through the process. Additionally, Mobilize has a comprehensive help center where you can search for guides on different features.
Topics:
I. Creating your first event on Mobilize
I. Creating your first event on Mobilize
1. Choose the kind of event you’re going to host
What type of event do you want to host? Mobilize does not require you to create a username/password account, so simply click one of the links below to get started.
Tip: Each option also links to a guide to help you host that type of event successfully. This page will just be focused on how to post and manage your event on Mobilize.
Canvass meetup or carpool | College canvass meetup or carpool
High-traffic canvass | College high-traffic canvass (for volunteer recruitment or voter registration)
2. Tell us about your event
Here are some tips for each field on the event creation page, with the same heading and in the same order that they appear on Mobilize. Read along here as you scroll through the Mobilize page, or download and print the guide:
Basic information: The pre-filled text in the “event title” and “event description” is just a suggestion to get you started! You can customize this information to better reflect your event.
Photo: You cannot edit the default image that displays with your event. If you want to design your own image, email us your graphic at host@swingleft.org, and we’ll add it for you! Mobilize recommends images 1200 pixels wide and 630 pixels tall; please follow our brand guidelines to ensure your graphic matches our organization’s style.
Visibility: “Public” events will be listed on mobilize.us and swingleft.org; use this option if you want to advertise your event to folks you don’t already know. Want to keep things among your direct invitees? Select “private” instead.
Tip: Mobilize does not allow you to save a draft of your event. But you can always keep your event “private” until it’s ready, and then change it to “public” and save.
Location: Mobilize supports both in-person and virtual events.
For virtual events, you should still add your zip code so that Mobilize promotes it to potential volunteers who live near you. If you don’t select a zip code, your event will not come up in a search on mobilize.us or swingleft.org, and you might be missing out on signups!
For in-person events, you can select “Only attendees can see this location” so that volunteers will only see the event address after they register. You can also just enter a city/state/zip code, if you don’t want to share the full address. However, be sure you have another plan for letting people know where the event is (options below).
Date and time: Enter the date/time(s). For some events, you can offer multiple dates and times for an event, which is helpful if you host a recurring event every week, month, etc.
Video call link: For virtual events, enter your Zoom link here.
Capacity: If you’d like to limit the number of people at your event or shift, set a maximum capacity after each date and time. This is optional, and more typical for in-person events with limited space. But remember, there is always a “flake rate” of people not showing up, so consider setting your capacity limit higher than it actually is to account for that.
Communications: Event hosts are required to list a phone number. Don’t worry—it is NOT publicly listed on the event, just sent to volunteers who RSVP for your event in their confirmation email, so they can get in touch with you if needed.
“Additional info for attendees” will be sent in an automated registration email once someone signs up for your event. It won’t be displayed on the event page, so use this for anything you don’t want publicized. For example, the exact address and other private details should go in this section; that way, anything private is only going to folks who actually sign up for your event. This is also a great place to put pre-event instructions; think about what you want volunteers to do before arriving, or bring with them, and put those tips here.
Whatever info you put in this box will also be included in an automated confirmation and reminder email that Mobilize sends your registered attendees closer to the event date.
Accessibility: Let attendees know if the space is ADA compliant, and/or describe the location’s accommodations. For virtual events, it's OK if you don’t know the answer to the question—you can leave the box unchecked.
Note: Many voter contact activities inherently are not ADA compliant. To help volunteers with disabilities navigate how they might be able to participate, you can use the open-ended box to give instructions such as, “If you have a disability and require special accommodations, please contact the event organizer and we’ll do our best to work with you.” You might also consider talking with your campaign contact about options to accommodate your volunteers' needs.
Group chat: The group chat feature will be automatically toggled off. We recommend you keep this disabled and find other means to communicate, such as a group chat, Slack channel, or direct Mobilize email. Group chats can clutter your volunteers’ inboxes and make important information hard to find. However, you may still enable it if you find the feature useful.
Who else is hosting this event with you? If there are other volunteers helping you with your event, click the “Add a co-host” button and enter their information. Co-hosts will have the same privileges as you: they are able to see the full attendee list, send emails, and modify event settings. However, they will need to log into Mobilize separately using the email address you’ve listed as a co-host. They can log in using the “magic link” process described below.
3. Finalize event creation
Finalize event creation by clicking “continue with email.” If you prefer to use Gmail, click “continue with Google.” This is not creating an account (Mobilize doesn’t put you through the hassle of a username/password); it just associates the event with your email address so you can manage it moving forward, as we go over in the next section.
Note: We do not recommend using your Facebook login to post on Mobilize (although we do recommend promoting the event on Facebook!).
Click “host this event”!
If you signed in with Google, your event is live! Skip this step.
If you signed in with email, you have one more step. You’ll receive an email to “verify your event.” Click the link in that email. If you don’t receive the email, check your spam/junk folder. If you do not verify the event, it will not be published.
Once your event is live, you’ll receive an email from Mobilize with the subject line “Your event is live.” If you don’t see the email in your inbox after submitting the event, check your spam folder. From the email, you can:
View event page: This links to the live event signup page that your prospective attendees will see. Note: You should NOT share links starting with mobilize.us/dashboard/swingleft because only event hosts can access them. The link you share should look something like: mobilize.us/swingleft/###### (without the “dashboard”).
Manage in your dashboard: How to make changes and manage your attendees on the back end. More guidance on this below!
Contact organization: Email us at host@swingleft.org with any questions or concerns.
If you need any assistance, please feel free to email us at host@swingleft.org.
II. Logging in and managing your events
Now that you’ve created your event, how do you get back into Mobilize to check on signups and send communications to attendees?
Logging into your Mobilize account
You don’t use a password to log in to Mobilize. If you use the same device and browser to manage your event, you’ll usually stay logged in to Mobilize. You can visit mobilize.us/dashboard/swingleft (we recommend you bookmark this address) to see your event.
If you are not already logged in, enter your email address to get a “Magic Link” sent to the email you used to create your event on Mobilize. Check your email inbox (or spam) for that magic link, and you’ll be able to use it to log back into Mobilize.
If you’ve listed co-hosts for the event, they can use this process to log into their own dashboard and see the event as well.
Manage events from your Mobilize dashboard
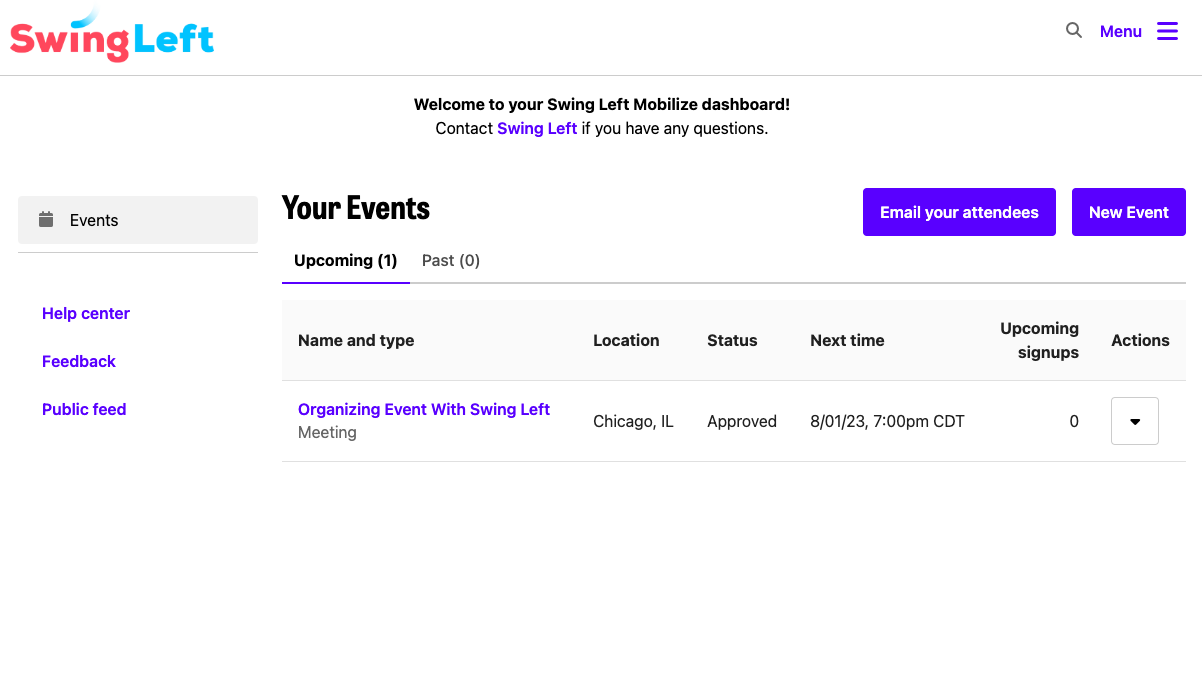
Whenever you click on mobilize.us/dashboard/swingleft, you’ll be taken to your Mobilize events dashboard. From here, you’ll be able to manage your events. Once you’ve set up multiple events, you’ll be able to manage all upcoming and past events you’ve ever posted on Mobilize. You will not be able to access this Mobilize dashboard prior to setting up your first event. Mobilize will show you your event in three layers:
The dashboard which will list all of “your events.”
The event details page which will list the details and all shifts for that event. Most events only have one shift (i.e. time slot), but if you’ve created an event with multiple shift options (e.g. a weekly phone bank) you’ll see all shifts listed.
The shift details page which will list the attendees for that shift (specified day and time).
From this initial dashboard screen (pictured below), you can view your event details by clicking on the event name link itself. That brings you to the event details page (below).
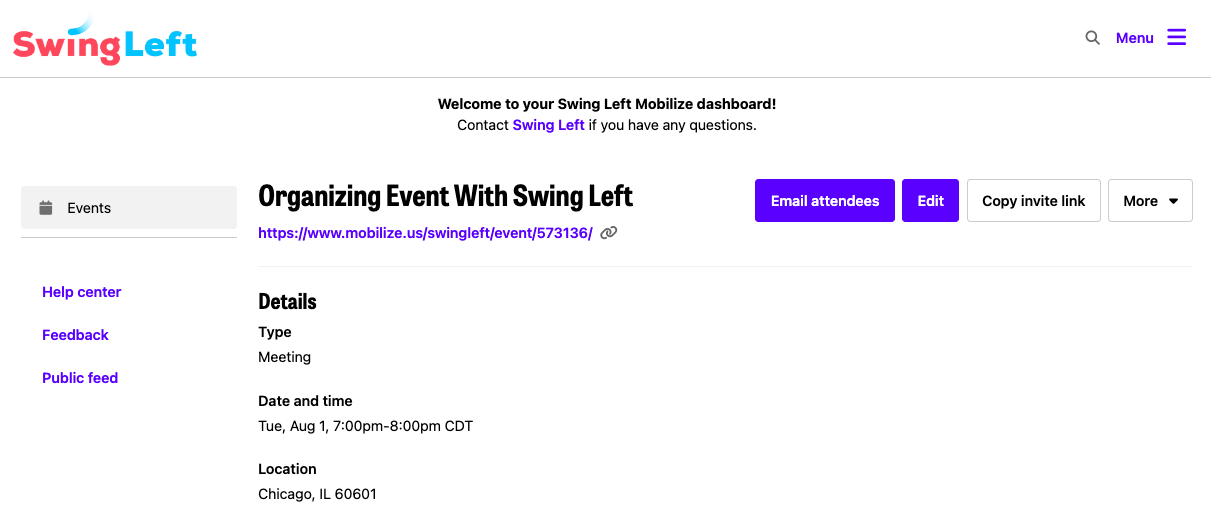
You can get to several common functions from this event details page, including:
Email attendees through Mobilize with more information, reminders, and thank-yous. See the next section for how to manage communications with the volunteers who have RSVP’d to your event.
Edit your event details.
Copy invite link to share with potential attendees.
Note: Do not simply copy the link from your browser. You should not share links starting with mobilize.us/dashboard/swingleft as only event hosts can access them. The link you share should look something like: mobilize.us/swingleft/event/123456 (without the “dashboard”).
Use the "More" button for additional options:
Delete event: If your event is no longer happening, you can delete your event. Mobilize will automatically send a message to anyone who has signed up, but if you want to share a more personalized message, we recommend emailing all signups before you hit delete. See the next section for how to email attendees.
III. Viewing RSVPs and communicating with attendees
Managing attendees
So who is coming to your event? Scroll down on the event details page to see the “Shifts and Signups” section where you’ll view and manage your RSVPs.
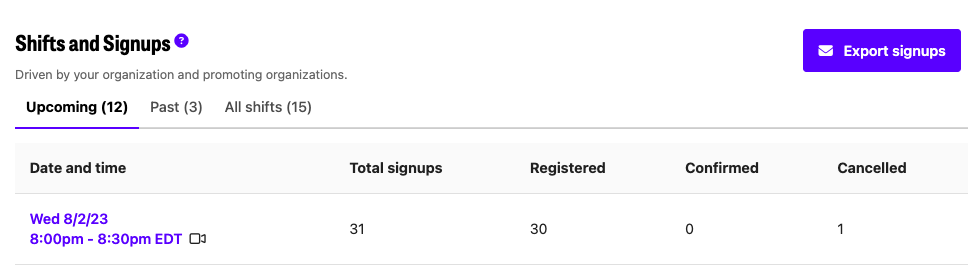
Mobilize sorts everyone who has signed up for an event into statuses that help keep track of who signed up, who confirmed, who canceled, and who attended. Attendees move throughout the various statuses based on responses they give to the automated texts and emails, but you can manually move respondents to a different status as well.
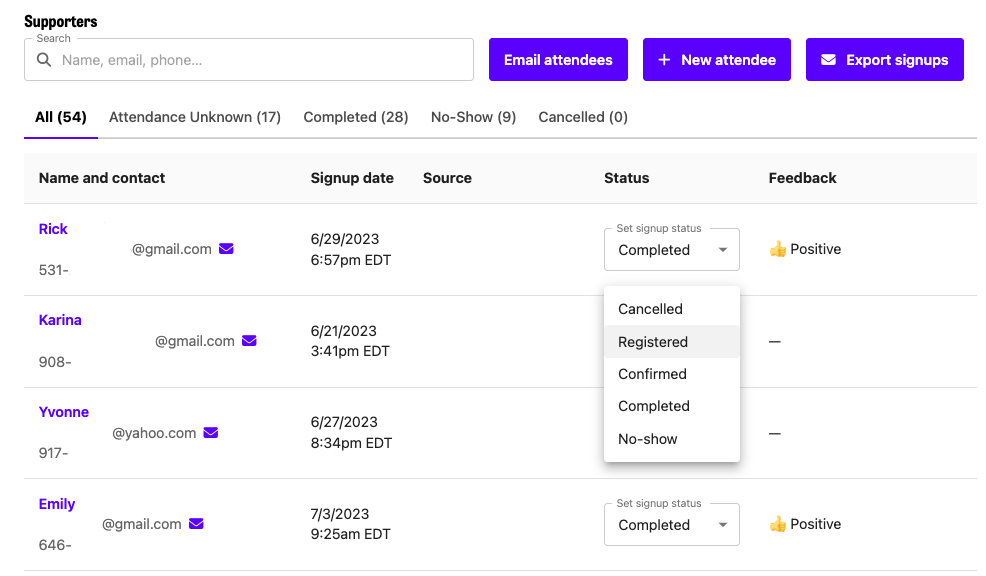
To view the list of attendees, click on the date and time in blue which will open a page titled “Shift details: [your event name]” and then scroll down to the “Supporters” section.
Before your event
Mobilize sorts event RSVPs into one of three status categories BEFORE an event:
Registered: Someone who has signed up for the event but not yet confirmed
Confirmed: Someone who has registered for an event and confirmed their attendance by responding to their automated Mobilize text message or email
Canceled: Someone who signed up but then canceled
Keeping an accurate count will help you plan for the event. Remember, you can update these statuses manually if someone confirms or cancels with you directly.
After your event
Mobilize sorts event RSVPs into one of five categories AFTER an event:
Completed: Someone who attended the event
Confirmed or Registered: Someone who signed up but it’s unknown whether they attended, so they retain their original “Confirmed” or “Registered” status from before the event.
No-show: Someone who signed up for the event but didn’t attend
Canceled: Someone who signed up but then canceled before the event started
Westronglysuggest updating these statuses after your event, using the arrow. You can do this live at a sign-in table, or after the event based on who showed up. This includes manually adding walk-ups who did not register previously (see next section).
Note: For virtual events, Mobilize will try to categorize who showed up and who did not based on who clicked on the Zoom link. However, this does not work perfectly since some attendees may get the Zoom link via other communications outside of Mobilize, so we highly recommend taking attendance at all events and recording it in Mobilize afterward.
How to manually add signups
You can add attendees manually to an event—even if they don’t sign up themselves. This is useful when someone comes to your event who didn’t register or if someone who has registered asks you to add their friend to the list:
On that same “Shift details” page, scroll down to “Supporters” to see the attendee list, and hit the blue button that says “+ New attendee”
An “add attendee” box will pop up. Use that to search for the person in the system (searching by email or phone number is best), and if they’re not in there, click “add a new supporter to Swing Left.”

How to export signups
From the event details page, click the blue “Export signups” box. You’ll receive a link in your email inbox that will allow you to download a spreadsheet of RSVPs. This file also includes when the attendees signed up, how they heard about the event, and after the event, any feedback the attendees provided. If your event has multiple shifts and you only want to download the information for a single shift, go to the “Shift details” page first before clicking the “Export signups” button.
Communicating with your attendees
Mobilize automated communications
Mobilize does a lot of work on its own to ensure people who RSVP for an event follow through on attending the event and (we hope!) come back for more events.
Registration email: After signing up for an event, attendees receive an automated registration email from Mobilize confirming that they’ve signed up for an event. This email provides date and location information, as well as any additional information you added to the “Additional info for attendees” field when creating the event.
Confirmation/reminder email and text:Mobilize also sends a confirmation/reminder email and text message to attendees—and they have data backing up the effectiveness of these reminders. A reminder email and text are sent the day before the event, and a second reminder email is sent the morning of the event.
The reminder email and text will ask volunteers to confirm that they are still planning to attend, and also gives them the chance to say they will no longer attend.
Note: Attendees have the option to opt out of text message and email reminders, so it’s possible that not all of your attendees will receive these.
You can view who has confirmed and who has canceled on the “Shift details” page for your event.
Event follow up, thank you, and closeout: All attendees (except those who canceled their RSVPs or opted out of SMS/email notifications) will also receive an email and text message afterward asking them to rate the event (simple poll: positive or negative), say that they didn’t attend, and leave feedback on the event. This gives you, as the host, valuable data on the event from participants. You can view the rating data on your event details page, and export your participants list in order to review the qualitative feedback.
Personalized communications
Mobilize does a lot of work on its own to ensure people who RSVP for an event follow through on attending the event and (we hope!) come back for more events.
Through Mobilize: Visit the event details page and click the blue “Email attendees” button. A pop-up will appear that allows you to filter who receives the email and send a custom note. If your event has multiple shifts and you only want to email attendees of a single shift, go to the “Shift details” page first before clicking the “Email attendees” button.
Outside of Mobilize: To cut through the noise of the automated emails in our inbox, you might want to email, text, or even call attendees outside of Mobilize. To do that, export the signups as outlined above, and use the contact information in that spreadsheet. You’ll be able to see who has canceled, confirmed, etc so you can decide who you want to contact. Confirmation calls, or texts from your personal number, are a great way to personalize outreach and increase attendance at your event.
If you’re sending a mass email, make sure to use “bcc” for the email addresses so that you’re not sharing attendees’ contact information.
Data management for Swing Left group leaders
Are you a group leader using Swing Left’s Group Builder tool? Make sure you are marked as an “admin” or “core member” on your Group Builder page. Then, anyone who signs up for your Mobilize event – who isn’t already part of your group in Group Builder – will be automatically added to your list of members, as long as you (or you co-leaders) are using the same email address.
Action recommended: You can double check this by visiting your group page and seeing if the event appears. If it does not appear, let us know at host@swingleft.org and we’ll make sure it’s linked.
If you use a different data management tool such as Mailchimp or Google Sheets, you can export a list of your attendees into a spreadsheet and then upload them into whatever program you use to manage your group or newsletter program.
Questions?
Mobilize has a comprehensive help center, and you can always reach our team at host@swingleft.org.